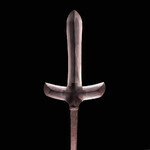
MJS Posted August 10, 2021 Report Posted August 10, 2021 Hi all, I am trying to find a good setup to make acceptable photographs of nihonto. I'm now using an acrylic table, lying on top of a darkened (sword-sized) box. Still experimenting with the ideal angles for lighting. My "model" is a jumonji yari, as it is relatively small and light. I found that it is particularly challenging to get the lighting right for these, especially when the goal is to capture the entire blade including nakago. I made this image by merging two separate photographs, one with the lighting from the sides and one with lighting from the front and back. It is quite a bit of work to make the merge work, so I would prefer a solution where the lighting captures the details of the yari from all directions. But the more lights I use, the higher the risk of unwanted glare or overexposure on particular areas. Work in progress I guess! I'm looking for feedback on the style of photography, and for ideas to bring out the best from a piece with such a complicated shape. Technical tips and tricks are welcome too, of course! I feel something is "missing" but can't quite figure out what is it is. Mark 2 1 Quote
FZ1 Posted August 10, 2021 Report Posted August 10, 2021 There's a chap on YouTube called Walter Sorrells who has done a video about this. He also recommends watching Part 1 of his "How to Photograph Knives" mini-series. HTH Jon H 1 Quote
FZ1 Posted August 10, 2021 Report Posted August 10, 2021 P.S. I love the shape of jumonji yari, but I can see how difficult it can be to light them for photos. Quote
Promo Posted August 12, 2021 Report Posted August 12, 2021 It seems to me that the white balance is incorrect since your picture has lots of red in it. Make sure to have the correct setting and then re-take them; when reworking avoid using settings such as "auto tone" or "auto color". Additionally the outer border where the "black part" begins is extremely sharp, especially when looking at it in full resolution. The therefore extreme contrast from a white pixel whereas the next is dark and not even where it "jumps back a pixel in the row below" (tough to express things like that when not a native English speaker, I hope you nevertheless understand what I mean!) there is a single pixel that tries to smoothen this contrast, it simply looks like done in minecraft when looking at it in detail. I highlighted some of the later mentioned details in the attached picture, maybe this makes it easier to understand. You might also try experimenting with HDR pictures, especially since it anyway is a still picture. Quote
MJS Posted September 1, 2021 Author Report Posted September 1, 2021 Hi Georg! Apologies for the late reply, was on vacation in bad-internet-land. Thank you for your feedback! I will definitely have a good look at proper white balance. The color temp of the tube lights that I use is adjustable, and I have so far not paid much attention to it. I also agree on your remarks regarding the border between object and background. That will be a more difficult experiment, because even the smallest dust particles are lit up like lightbulbs in the current setup. I digitally removed them, but maybe I should just try to get a cleaner baseline picture . Or get better at postprocessing (maybe more "feather" along the edges)! Best, Mark Quote

Recommended Posts
Join the conversation
You can post now and register later. If you have an account, sign in now to post with your account.