ChrisM
-
Posts
54 -
Joined
-
Last visited


ChrisM's Achievements
")


-
@jeremy It took a while, but the swords did eventually arrive and were legally entered into the country. They're with the artisan now and are (hopefully) moving forward in the production queue.
-
Ubu Yoshimasa Tachi from the early kamakura period
ChrisM replied to ChrisM's topic in General Nihonto Related Discussion
For sure - I had already purchased it before Tanobe had seen it and was really interested to see what he said. Especially the "Ubu" part was a surprise to my uneducated brain. If your ever find yourself in the Greater Seattle area, give me a shout. Happy to do some show and tell! -
Ubu Yoshimasa Tachi from the early kamakura period
ChrisM replied to ChrisM's topic in General Nihonto Related Discussion
@Rivkin What makes you think the range is 1300s? I don't know enough here to have any historical opinion and am pretty much just parroting what people more educated than I have told me. Please, tell me more about what you see! Via Markus Sesko, who has forgotten more than I will even know, I got this: -
My photography journey continues, this time with a Macro lens added in for some fun. For this, I wanted to start bringing in the fine details. From an interest viewpoint: I find the rust on the Tang very visually interesting, especially as it transitions from the tang into the habaki area. The kissaki, of course, is always fascinating to look at in great detail. That little spot of rust right near the kissaki is interesting - and it got some extra oil tonight as I put things away! From a visual interest viewpoint, with just macro shots I found the overall image quite dull. I had to bring in the blade and the sayagaki to give me enough visual context to tell what's going on, at which point the image become more interesting. The hardest part here, now that I've got basic lighting tamed, is figuring out what NOT to show. Each of the macro shots has fantastic detail that only gets more interesting as one zooms in. The tachi shown here is an Ubu Yoshimasa from the early kamakura period with Tokubetsu Hozon papers. Tenobe-san's sayagaki, translated via Markus Sesko, says:

-
That was a challenge - and still is. For the shots here, I used Nikon Camera Control Pro 2in "Trial Mode" for focus. That allows me to do live view at 200% size, which means I can get focus to be just about perfect. Once focus is locked in, I exit Nikon's software and switch over to lightroom for the shooting / capturing. My honest opinion is that both programs are poor for tethered shooting. Camera Control Pro 2, in addition to be ancient and expensive, is lousy and I'm unwilling to pay for it. Lightroom is good for general photo management but terrible for tethered shooting. I remain in search of a great tethered shooting solution. The specific issues I have: CCP2 is expensive. Nikon software should be free when you buy their top-of-the-line camera. CCP2 crashes. Often. CCP2 has a UX that is, to put it mildly, not intuitive. CCP2 only recognized my camera about 1/2 the time. Lightroom doesn't support live view in a useful way. Lightroom always shoots the RAW and JPG file. I have no use in this situation for the JPG. Lightroom always shows me the processed JPG, which means getting color and exposure "just right" is damn near impossible. Lightroom doesn't support bracketing. I want to fire off +2, +1, 0, -1, -2 exposure sequences but this isn't supported. There is a list of other minor frustrations, but with a bit of patience capturing images isn't too bad.
-
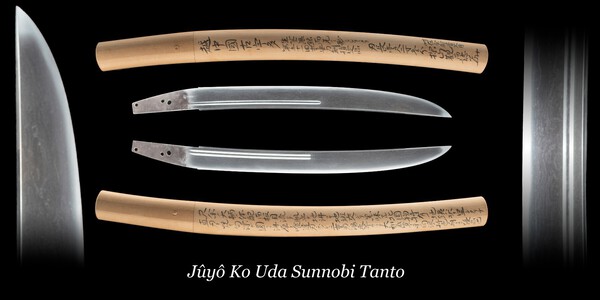
New addition to collection (Juyo Ko Uda Sunnobi Tanto)
ChrisM replied to ChrisM's topic in General Nihonto Related Discussion
I'm still new to stewardship of Juyo blades, but they are certainly amazing. My struggle with this particular set of shots is that I kept overexposing the grooves. I have some images with them properly exposed, but I couldn't get a single shot that was correct over the entire blade. I choose to skip masking & compositing and just live with the overexposure. For my next trick, I picked up a true Macro lens and am going to try building some deepzoom shots. -
A tanto is interesting to shoot, and much easier than a katana or a tachi. The smaller size makes the camera placement and lighting more forgiving. A koshiare for this beautiful piece is currently under construction and should arrive sometime early in 2024. I'm looking forward to getting pictures of everything together!
- 5 replies
-
- 15
-

-

-

-

-
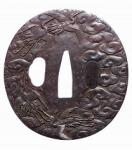
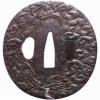
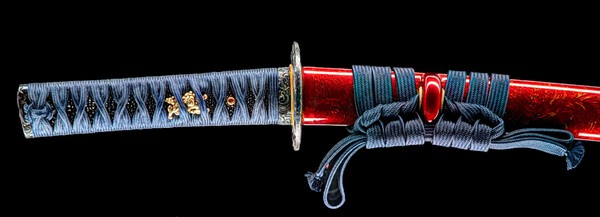
It turns out that not only is photographing nihonto difficult, photographing Koshiare is also quite tricky. I've been slowly dialing in my photo setup, and figured tonight I would branch out into Koshiare. The setup I'm using here is: Shooting on Plexiglass, over a black background. This is essentially the Darcy Trick, that has been pretty well documented. Same basic setup as blades. 2x GVM Professional grade RBG light tubes. These things are simply fantastic. I cannot overstate this. Being able to tweak lighting for color, intensity, and other variables from an iPhone while shooting is almost like cheating. And these things put out flawless light. Big Tripod, with a boom arm. Added counterweights to hold it in place. The stability is fantastic. I've been shooting (mostly) with a 50mm lens, and with the swords about 12" from the floor, the camera is over my head. Using a wider lens means the camera is lower, but perspective starts to look weird at less than 40mm. Nikon Camera and various lenses. I'm shooting at ISO 200, and F8. Whitebalance is hard set at 5600 (matching the GVM lights), and shutter speed varies depending on lighting. Shooting tethered via Lightroom directly to a laptop. The hardest parts of this are twofold: Perfect focus is hard. The camera is up high enough that you can't see, and even shooting at F8, the focus is hard. Lightroom doesn't support zooming in on live view, so this means using a different tethering tool to get focus just right, then swapping over to Lightroom to shoot. Once things are set the camera is steady and it's just about adjusting lights. Lighting. Reflective surfaces. Glare. Ugh. Double Ugh. Koshi are as challenging as Nihonto. The angles are more challenging due to the curved surfaces. Post processing is also a bit of an adventure. With blades, there's no real point in doing HDR merges or exposure blending. With the Koshiare, it's a bit more flexible which is both a blessing and a curse! In the first shot below, I added in some of the NBTHK paperwork for artistic feel, and think it came out well. In the single shot of the wakizashi, I just left it on a black background which is nice, but a bit boring.

- 6 replies
-
- 12
-
-
-
-
Shipping Swords to Japan w/o paperwork
ChrisM replied to ChrisM's topic in General Nihonto Related Discussion
I have not! The Ford Hallam fittings are black with gold butterflies and bamboo. I would like the menuki to be either butterfly or bamboo based, although a set of Heron’s would also work. Black with lots of gold, or even solid gold for the material. This daisho is modern, so age of fittings can be just about anything that catches my eye. I’m also fine mixing menuki - putting a butterfly and bamboo together would work. -
My daisho set and the Ford Hallam fittings are in Osaka, and look to be waiting until November. The Koshiare won’t be started until December, best case. I do have a fantastic craftsman in Okayama lined up, so that’s exciting. Osaka does reviews the 3rd week of odd numbered months, and the deadline for September was just missed by a few days. The importing of swords into Japan is a painful process full of very odd paperwork.

-
Adventures in Lighting, Part 2
ChrisM replied to ChrisM's topic in General Nihonto Related Discussion
Looking at this anew, the Kissakai needs more light. The different angle makes it not work with the same lights in a single shot. I have an image with the Kissakai properly exposed, but this will need a bit of compositing. -
Adventures in Lighting, Part 2
ChrisM replied to ChrisM's topic in General Nihonto Related Discussion
Looks to be a US vs UK issue. You could try ordering directly from GVM. -
My quest to take a decent picture of my nihonto continues. Today I had a few hours to get things going, and ended up on the following setup: 2x GVM 48" Lights. These lights are stunning, as they're fully adjustable for temperature, brightness, color, and even patterns. They run off AC or via batteries. Controls can be driven via DMX lighting controllers, or (as I did) via the GVM IOS App. These allow me to adjust brightness on both lights without actually having to physically touch anything. I went for the two-light package, complete with large pelican case and some other accessories. Not cheap, but I always get lots of use out of fun lighting kits... Wide plexiglass. Standard "Big black sheet" as a backdrop. Nikon D5 w/ 50mm F/1.4G on a tripod and ball-head. Fully tethered shooting via Lightroom to my laptop. Doing everything via Tripod and tethering allowed lighting adjustments, focus adjustments, and in-camera photo adjustments without having to actually touch the setup. Physically moving the lights around could be done pretty easily. The keys for me were: The closer I put the tube lights to the blade, the better everything looked. Height adjustments on the lights made a big difference. The lights along the blade edge are flat on the plexiglass, whereas the light on the back side is lifted up about 2 inches. Turn off all the other lights in the room, so the only source of lighting is the GVM lights. The Wakazashi image below is a single shot image, with a minor global curves adjustment in Photoshop. While the background was already pretty dark, I used the "Delete Background" button in Photoshop and it worked flawlessly.


-
After years of halfhearted attempts, I'm finally - eventually - going to get good at sword pictures. I started with Darcy's old guide, which calls for placing the blade(s) on a piece of large plexiglass and doing lighting with a florescent tube. This is my first set of results, using the following: 24 x 48 piece of Acrylic (not glass!) from Amazon. An old black muslin I've got covering up the floor. GVM RGB Tube DB45R. This is a waaaay more fun than an old fluorescent light. Adjustable everything, no flicker, and a full-on piece of pro gear. 50mm F/1.4G Lens on a Nikon D5. Mostly shot at F/4, ISO 200, and about 1/1000 as the shutter speed. I'm using a high shutter speed as I'm handholding right now as I move things around... So far, everything has just been handheld and auto focus. As I get the hang of the lighting and placement, I'll switch over to a tripod/boom, manual focus, and fully tethered shooting. The images below are all single-shot images, with some global exposure adjustment in lightroom. No HDR, compositing, or masking done. Trying to get the basics first. The sword has oil on it, and there's obviously some dust on the Arcylic still. Using a single light is making lighting across the angles of the sword really difficult. I can light one side, but not both - and I'm trying to avoid composite images. For my next step, I've ordered a 2nd DB45R light, and as they're wonderfully adjustable in brightness I'll set the blade between them, and get the brightness correct. FWIW, the blade is an Edo period Tokubetsu-Hozon Wakizashi by Hōki no Kami Fujiwara Nobutaka (伯耆守藤原信高), probably from the 1580s or so.


-
Juyo Awataguchi Listing
ChrisM replied to Utopianarian's topic in General Nihonto Related Discussion
This is how we end up with "Cutting Tested" swords. I'm sure the auction house would shamelessly put a premium price tag on it...