toukerb
-
Posts
22 -
Joined
-
Last visited
toukerb's Achievements
")


-
Many thanks John for your help it is much appreciated. marc
-
Hello, I would be most grateful if anyone might be able to help me with a translation of this kogatana mei. The blade is well forged with a pleasant notare hamon. Thanks in advance for your assistance. Marc

-
Hello Steven, Is there a particular Japanese designation for the stippling pattern, particularly visible on the seppa dai, which adorns your lovely tsuba? marc
-
Although this thread diverged onto an essentially technical digression about amalgam, I must thank Ford Hallam for indirectly suggesting an answer to my primary question: What may have been the extent of the original gilding on this tsuba? Indeed, in one of his contributions to the thread, he concluded by stating "The finer work is cut such that by the time the iron is patinated the marks are invisible to the naked eye". If I have chastised myself for not thinking of this myself, his comment prompted me to inspect the tsuba under higher magnification. Therein lay the key to my original query. I have yet to map out the extent of what remains of the preparatory work for the Numone-Zogan, but it seems clear that what remains of the gilding is a very partial rendition of the craftsman's intent. From the cursory inspection I made of it, I suspect that the original Numone-Zogan highlights likely resembled those of the later shakudo examples I've illustrated in this thread. It certainly make me wonder how many iron tosogu fittings, originally adorned with Numone-Zogan, now present an appearance far removed from that which they originally had.. marc
-
Hello John, While amalgam gilding on iron/steel did indeed exist in Europe prior to the 19thC, its use was primarily applied, to decorative objects which would not be subject to wear. Prior to the 1800s the gilding of swords and armour in Europe was almost exclusively performed with foil using Numone-Zogan like technique, or a heat/burnishing method. The damascening (Numone-Zogan) technique produced the most lustrous and long wearing of all three. Amalgam gilding, in the realm of weapons was essentially limited to the gilded highlights of the blued first third of post-1740 blades, which received adequate protection from their scabbards, and thus did not require the more elaborate and time consuming techniques. The Technical Encyclopedia referenced below describes the three methods. You may be interested to learn that the amalgam gilding of iron/steel did not necessarily require prior copper plating. I've included a 'google translation' of the relevant section for those among us who might find it laborious to wade though 18thC French texts. Hope this is of interest, marc Encyclopédie méthodique. Arts et métiers mécaniques. Tome 2 / , [par Jacques Lacombe] - 1782-1791 p 352-354 "Gilding on fire or on metals. There are three usual ways of gilding with fire, to know in ground gold; in gold simply in foil, and in chopped gold; but we can add a fourth, which we will discuss at the end of this article. Gold gilding or gold vermeil, is made with gold amalgamated with mercury, to a certain extent, which is usually an ounce of quicksilver on a big gold. For this operation the crucible is first blushed; then the gold and the quicksilver having been put in it, they are gently stirred with a hook, till we see that the gold is melted, & incorporated into quicksilver; after which they are thus thrown together in water to wash them. To prepare the metal to receive the gold it is necessary to clean the metal that one wants to brown; what is done with strong water weakened with water; this is called pickling or stripping. The metal being well dried, it is covered with this mixture of gold and bright silver, extending it as much as possible; in this state the metal is set on fire on the grate, or in the basket to be gilded, above which is a stove full of fire. The grate to be gilded is a small lattice of trellis thread, of which the pan is covered, and on which the work is laid; those that are silvered do not need so much cleanliness. The basket to be gilded is also a lattice of wire, which differs from the grid only in that it is concave & pressed a few inches. As quicksilver evaporates, if. that we can distinguish the places where it lacks gold, we repair the work by adding new amalgam where it is needed. To make this gilding more durable, the gilders rub the work with mercury & etching, and gild a fertilized time in the same way. They sometimes repeated this operation up to three or four times for the gold covering the metal to be of a suitable thickness. When the work is in this state it is finished with the brush-scratch which is a brush made of small brass threads. Lastly, it is colored by a process of which the gilders make a secret, but which is probably the same as that used to give color to the species of gold, which is described by the word Monnoyeur in the article on Le Blanchiment. To prepare the metals to receive the gold leaf gilding, one begins by scratching them with the grating, which is a sharp iron with four sharp edges similar to the iron of a sting. It is two to three inches long, and has a handle twelve to fifteen inches long. When the metal has been well scraped it is po! It with the sharp iron polisher, which does not differ from the burnisher of which we spoke above. Then the metal is heated. This operation is called blue, because when it is done on iron, it takes a blue color. When the metal is hot enough, apply the first layer of gold leaf that is slightly cleaned with a burnisher or polisher. The action of swallowing is to press against the forceps with this instrument, the leaves that have been applied. Normally only three or four layers are given, of a thin sheet of gold in the common works, and of two leaves in the fine works, and at each layer they are cut down and then put back into the fire, which is called annealing. After the last coat, the gold is able to be light brown with the burnisher of sanguine also called stone to brown. Gilding, which is called chopped gold, is done with gold leaves like the preceding, and it is practiced in the same manner, but it differs in two essential points. 1. When the metal has been scraped & polished, a prodigious number of small hatches are made, in all directions, with the chopping knife, which is a small knife with a short and wide steel blade, fitted with wood or wood. horn. These make the hatching made on the metals before the gold is applied to it, which have been called the chopped gold gilding, although the hatching no longer appears on the outside, when the gilding is finished. 2. For minced gilding it takes up to ten or twelve layers, two sheets of gold for each layer, instead of three or four for plain gilding. This large quantity of gold is necessary to cover the hatching, but the gilding, which is then much more beautiful and more solid."
-
Hello again John, The traditional western methods are usually based on either a technique akin to Numone-Zogan (achieving a rough surface on the iron mechanically), or by using a mordant to prepare the surface which is to receive the gilding. In either case the gold foil is then burnished, or hammered into place, to create a mechanical bond. marc
-
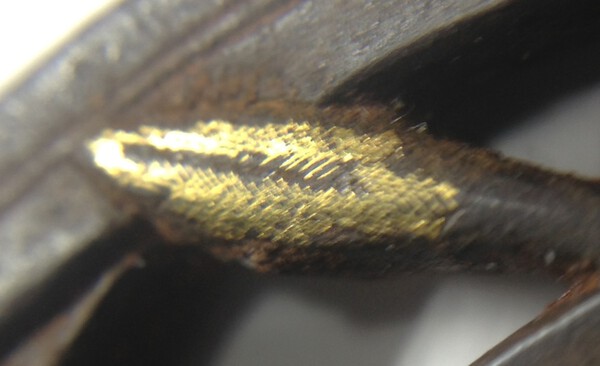
Many thanks John and Steven, once more, for your insights on this thread. I thought it might be useful to include a close up of the damascened buds, in which wear reveals the cross-hatching which I have since learned is associated with Numone-Zogan. I also came across a quote from H.C Guansaulus from his 1924 work: The Japanese sword and its decoration p119 which seems to confirm that Numone-Zogan was used, at least in part, on this tsuba: "Nunome-zogan is produced by hammering the inlay upon a surface which has been cross-hatched and scratched to a texture-like appearance, in the little threads of which the inlay gains a hold. This process may often be discovered upon pieces that are worn. " All the best, Marc
-
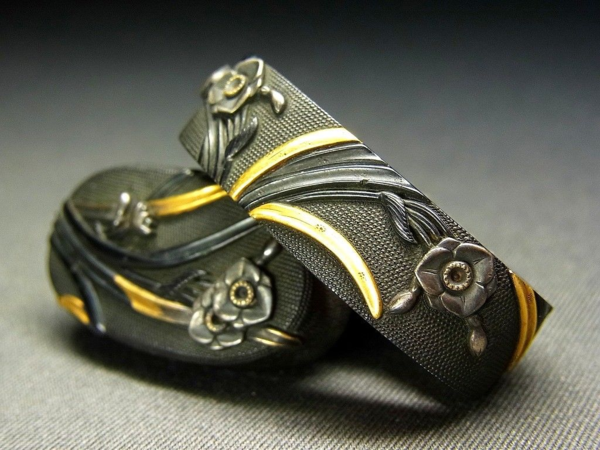
Hi John, Many thanks for your reply. The 'buds' were certainly damascened as very fine cross hatching can be discerned through the wear of the gilding. The thickness of the 'gilding' on the leaves (>10 microns, no cross hatching), however, makes me think that this is not amalgam. It also seems that the pattern of the gilding on the leaves is more reminiscent of wear than of deliberate decorative intent. The reason I included the shabuko example is that it seems that partial gilding of entire sections of leaves apparently belonged to the tosogu esthetic. Here is another photo which depicts a fuchi/kashira set with very similar partial gilding of leaves, illustrated in the shakudo example of my first post. The question which is of greatest interest to me is the origin of this unexpected, yet elegant treatment of leaves. All the best, Marc
-
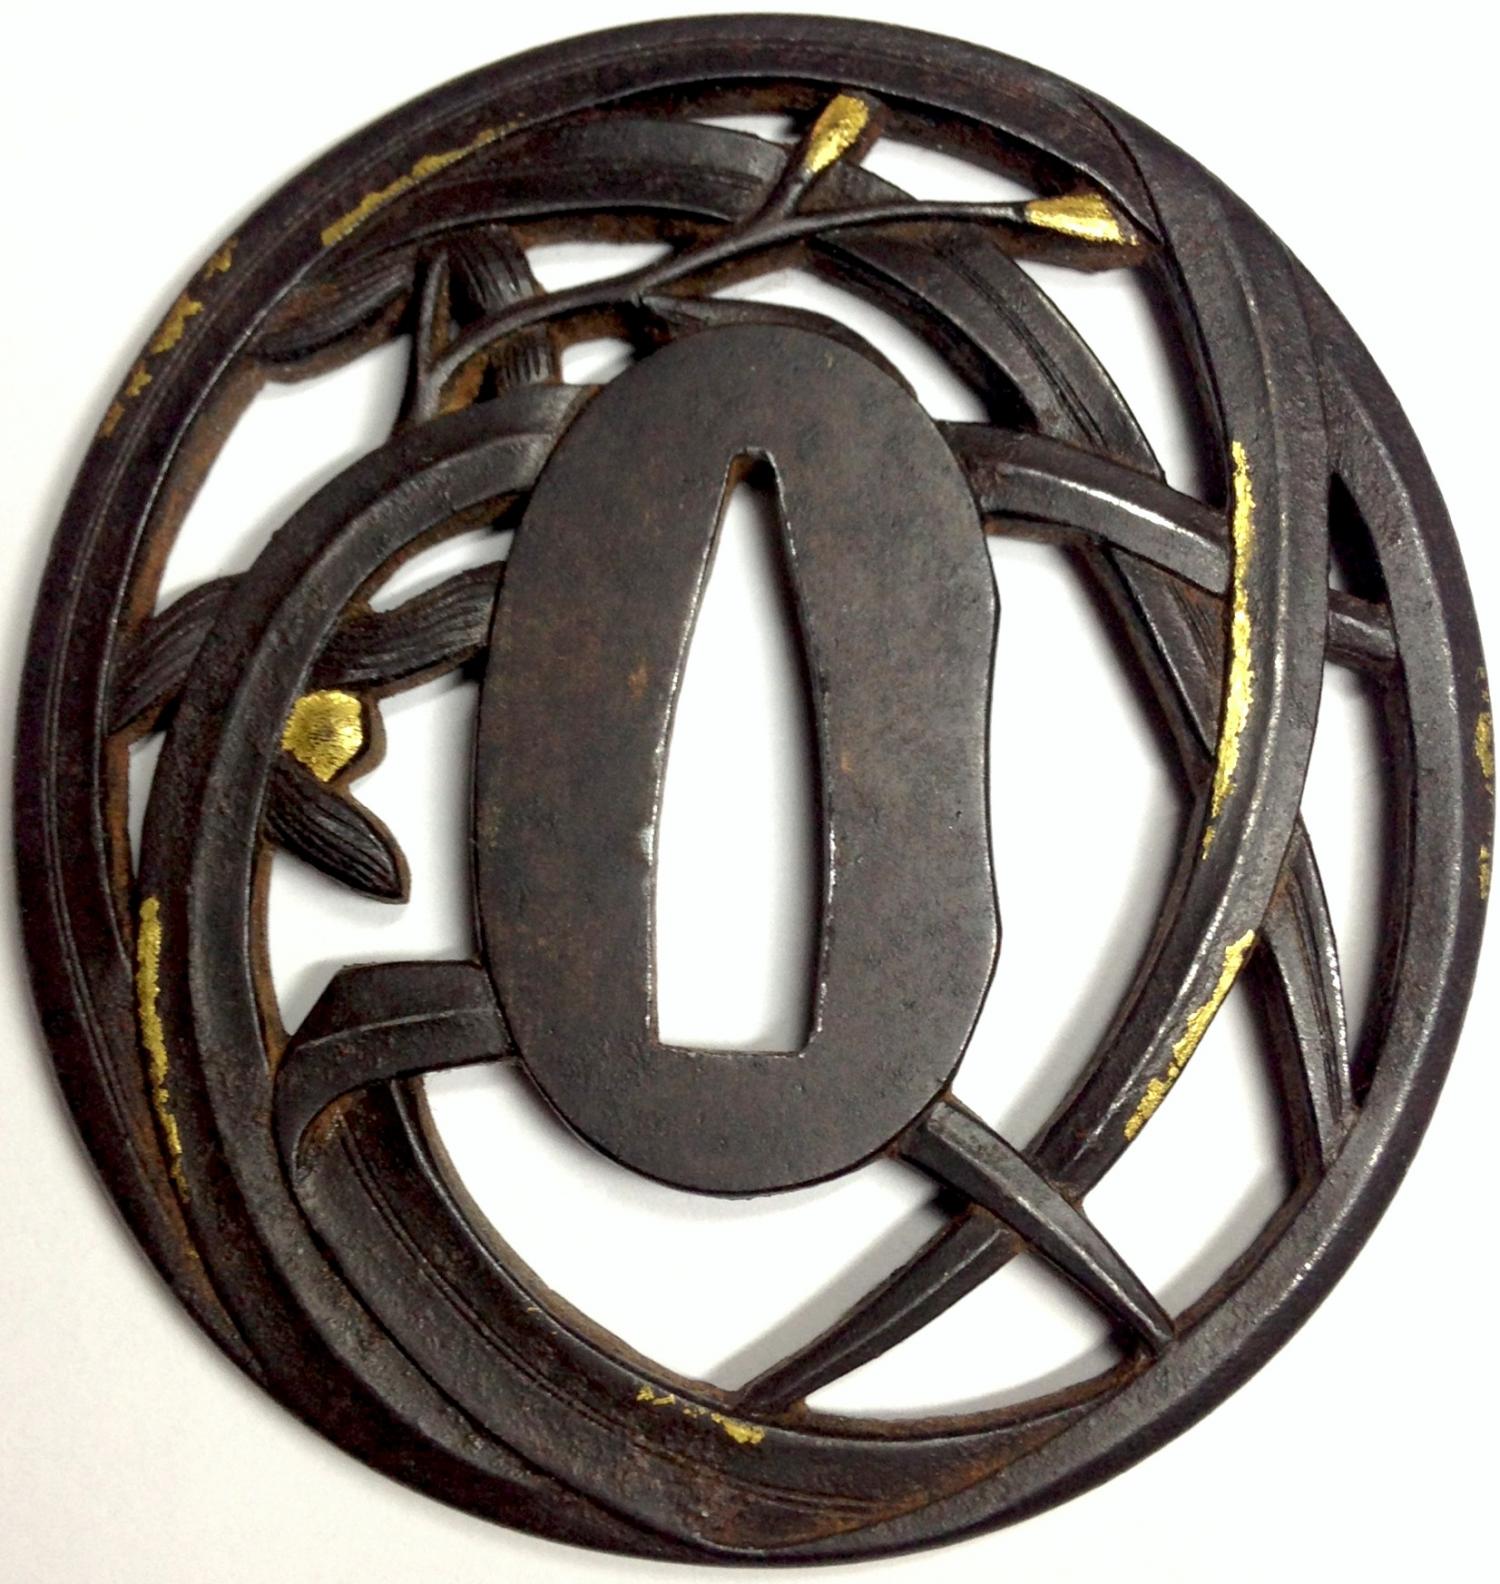
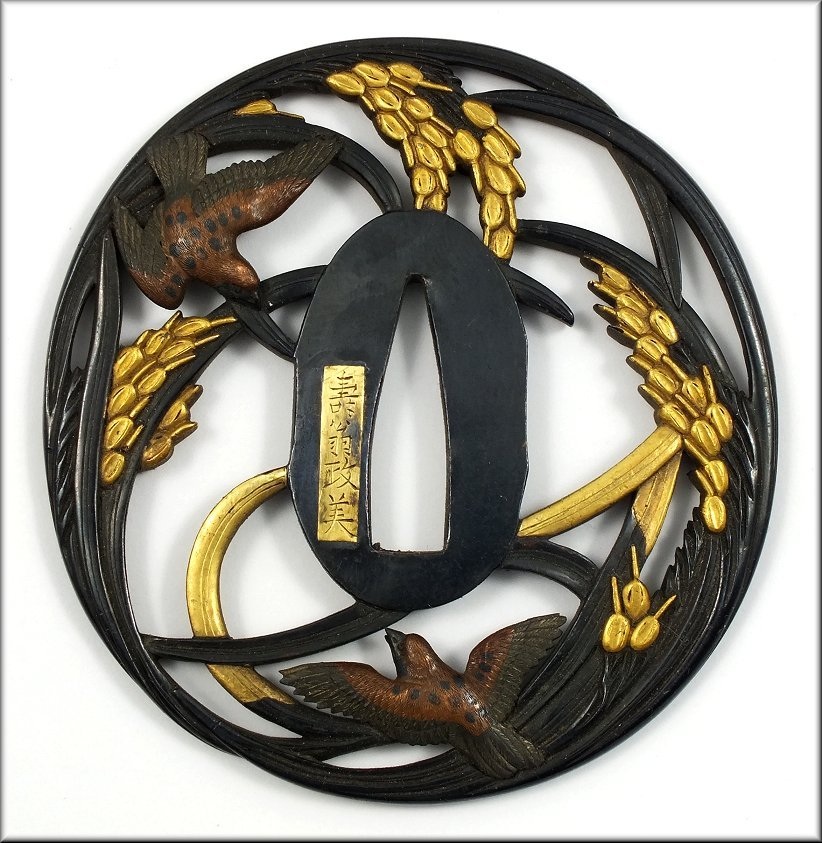
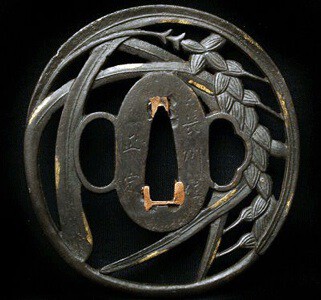
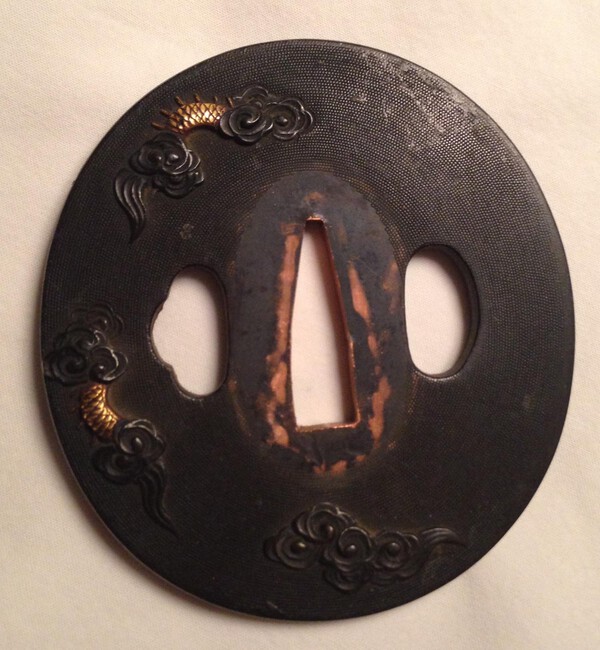
Hello, I recently purchased an iron sukashi tsuba (photo2) with remnants of applied gold foil (not amalgam gilding). (The gold is not inlayed, but appears to have been applied with some other technique; the usual damascenening file marks are absent). I've been able to find a photograph (photo3) of a similarly 'gilded' tsuba in the same style with even fewer remnants of applied gold foil. I have found references in Henri Joly's work that indicate that many iron tosogu elements were stripped, at some point, to recover the gold from their decoration. Does anyone from the forum know if these tsubas may have been victims of such abuse, or is their condition simply the result of wear and tear? I would also be most interested to know, if any of you could suggest what may have been their original appearance. Photo 1 is of later shakudo example where the leaves were inexplicably (at least to me) only partially gilt in their original state. Is there any particular stylistic tradition which might explain this? Many thanks in advance for thoughts you may have in this regard, Marc


-
Many thanks to you all for all of your useful comments
-
Thanks for the rectification on the theme. It helped me find the following set which seems to be from the same shop (nearly identical except for silvering of certain details, and the menuki ) which they claim is of the YANAGAWA school: https://darumasan.blogspot.fr/2004/11/menuki-sword-fitting-and-tsuba.html
-
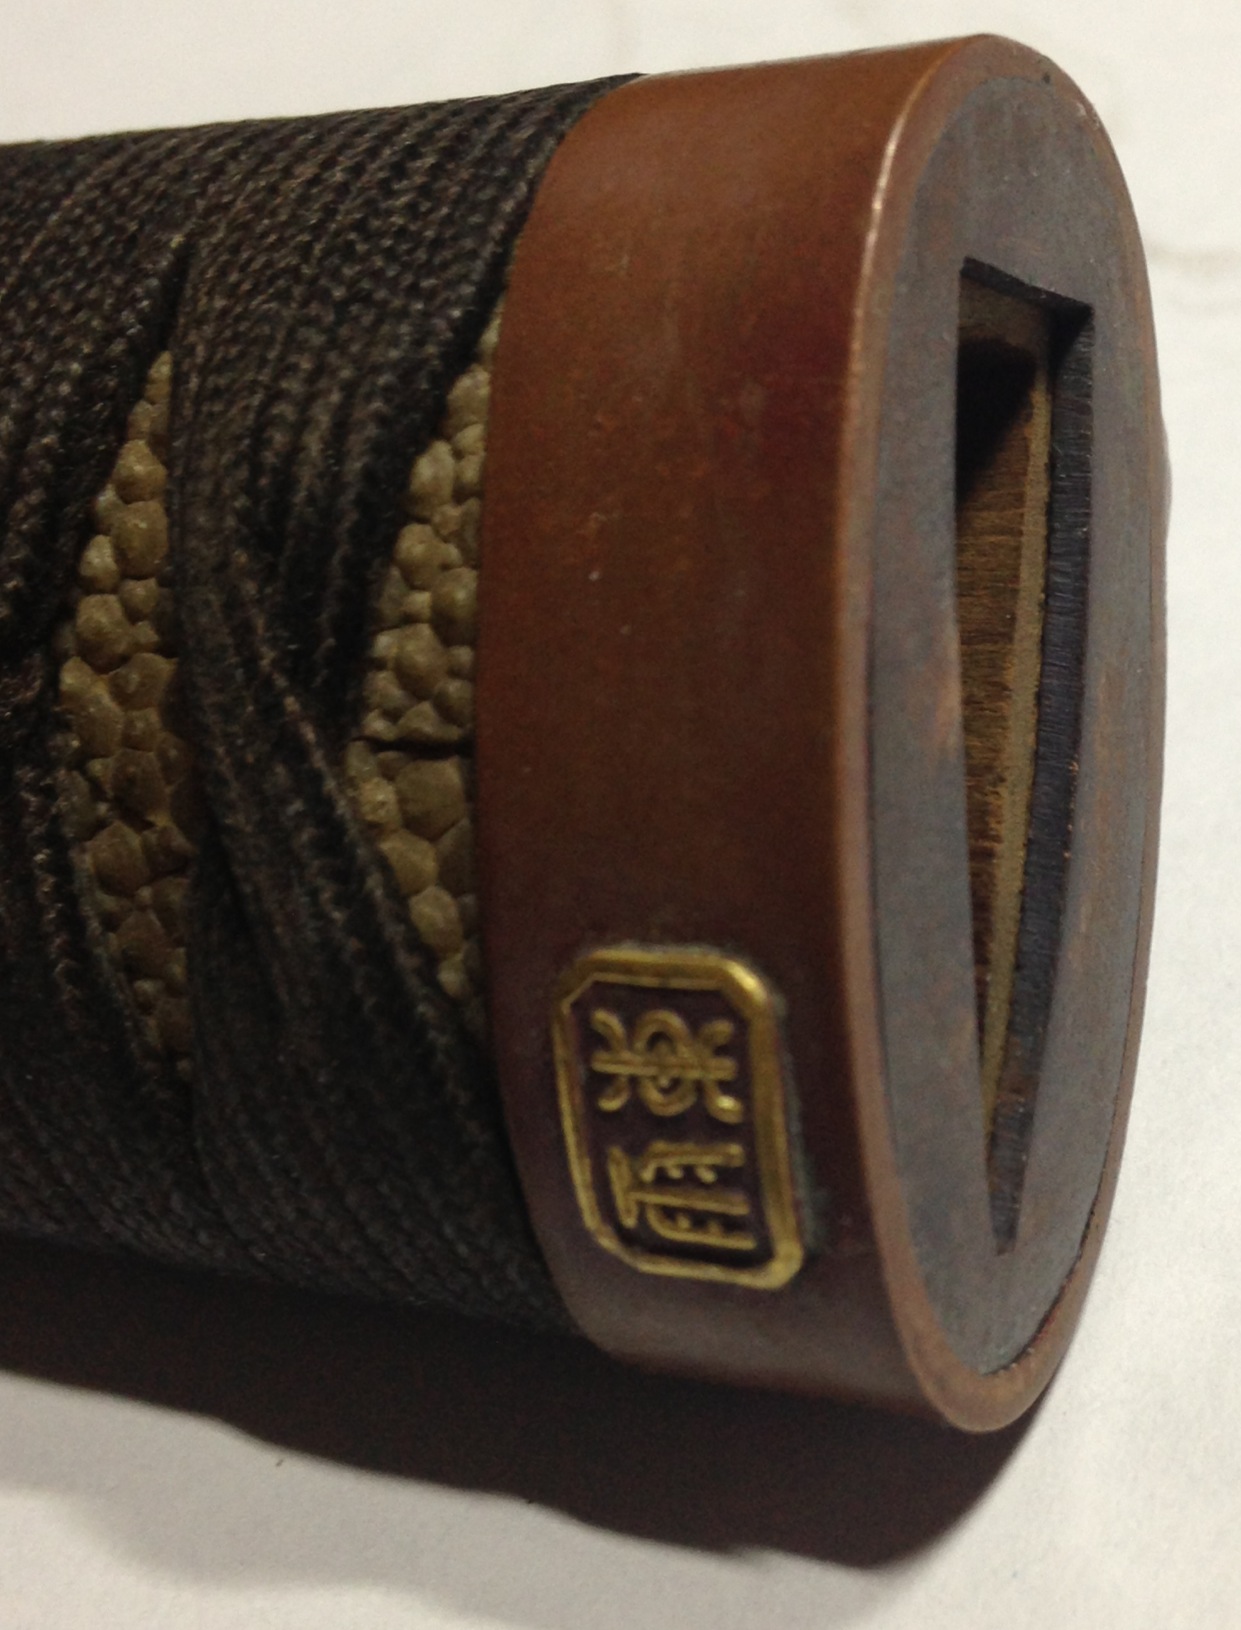
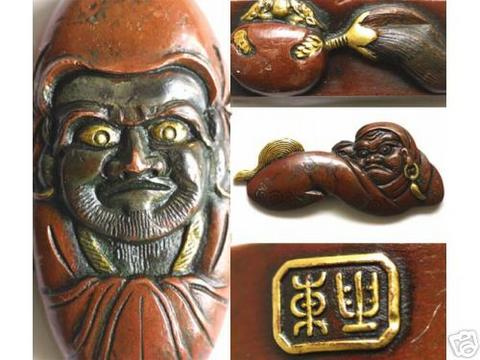
Hello, I would be most grateful for any help translating (or explaining) the presence of this element on a Jujiro themed fuchi/kashira. Is it a signature, or simply a good luck/fortune inscription. Many thanks in advance, Marc


-
Hello Darcy, I'm not sure that this tsuba is up to the correct level, as I am a newbie in this area, but thought I might risk it. It is part of the koshirae of a wakizashi I purchased recently. Nice nanako (also around the edge of the tsuba) and high relief gold zogan. Any thoughts you might have as to school/age/etc would be appreciated. :=) Marc

-
Help With Tsuba Identification Goto School/style ?
toukerb replied to toukerb's topic in General Nihonto Related Discussion
Many thanks Franco for your thoughts -
Help With Tsuba Identification Goto School/style ?
toukerb replied to toukerb's topic in General Nihonto Related Discussion
Thanks Stephen, I agree with you it's a pretty ugly piece of work Unfortunately it wishes to remain with the remainder of the koshirae it belongs to and with the Suriage blade housed within it. I'll let you know if I come across a loose one I can send you. marc